
Most Hawaii vacation photos look the same: blown-out sky, dark foreground, squinting faces, and a beach that could be anywhere. Hawaiʻi is absurdly photogenic, but the light is intense, the contrast is extreme, and the scenes that look stunning to your eyes translate poorly through a phone sensor that doesn’t know what to do with a 3,000-nit tropical sky.
These are practical fixes — not composition theory or Instagram filter recommendations. They work on any phone made in the last five years and on any camera. The single biggest improvement most people can make costs nothing: shoot at the right time of day.
The Light Problem (and the Simple Fix)
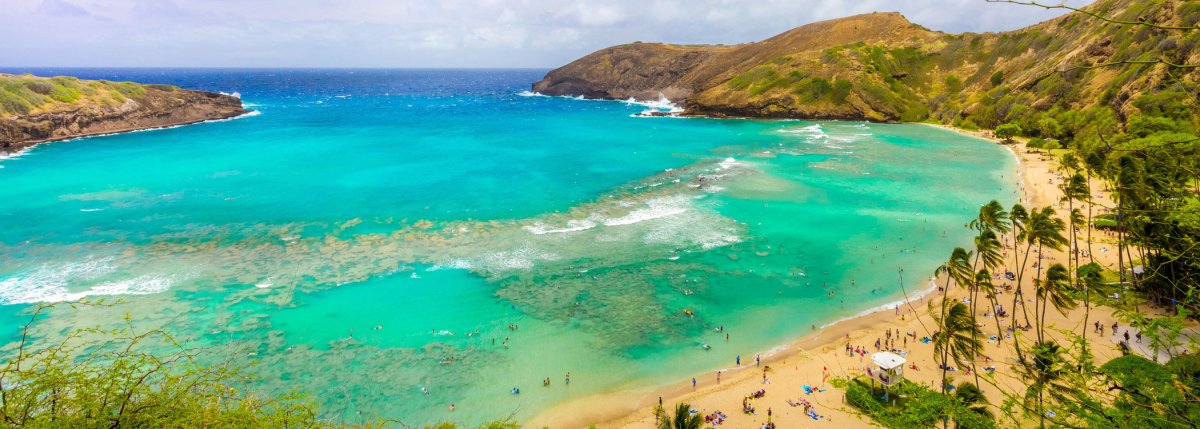
Hawaiʻi sits between 19 and 22 degrees north latitude. The sun climbs high and fast, and by 10 AM it’s directly overhead, creating harsh shadows and washed-out colors. Midday photos at the beach tend to look flat — bright sand, blazing sky, no texture or depth.
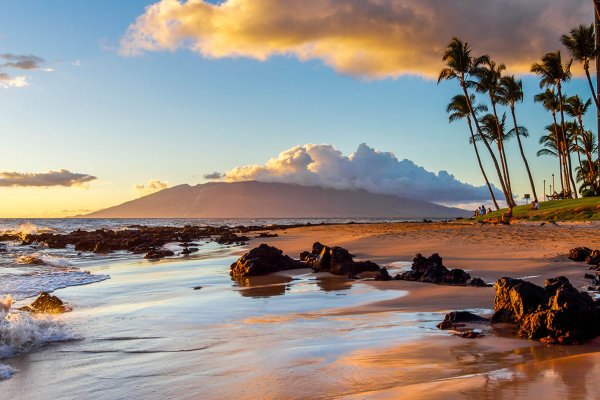
The fix is simple: shoot in the first and last 90 minutes of sunlight. Golden hour in Hawaiʻi runs roughly from sunrise to about 75 minutes after, and from about 75 minutes before sunset until dark. In summer, that means before 7:15 AM and after 5:45 PM. In winter, before 8:00 AM and after 4:45 PM.
During golden hour, the light goes warm and directional. Shadows have detail instead of going pure black. Skin looks good without flash. The ocean shifts from flat blue to layered turquoise and indigo. This is when photographers get the shots that make you want to go to Hawaiʻi.
If you can only change one thing about how you photograph this trip, change when you photograph. Wake up for sunrise once. Stay on the beach through sunset. The difference is dramatic.
Phone Photography: Settings That Matter
Most visitors shoot on a phone, and modern phone cameras are genuinely good in Hawaiʻi conditions — if you adjust a few things.
Start with exposure. When you tap the screen on iPhone or Android, the camera sets exposure for that spot. At the beach, tap on a person’s face — not the sky, not the sand. The sky might blow out slightly, but your subject will be properly lit. On iPhone, drag the sun icon down slightly to darken the overall exposure and recover some sky detail.
HDR should be on. It takes multiple exposures and combines them to handle the extreme contrast between bright sky and shadowed foreground. Most phones enable it automatically, but check your settings to be sure. Samsung: Settings > Camera > HDR. Older iPhones: verify it’s toggled on.
For landscapes, switch to the 0.5x ultrawide lens. It captures the sweep of a Hawaiian vista in a way the standard lens can’t. Nāpali Coast lookouts, volcanic craters, wide beach panoramas — the ultrawide gets it all in. Get close to a foreground element (a lava rock, a plumeria flower) and let the background stretch behind it.
Before every shot, wipe your lens. Sunscreen and salt spray accumulate all day, creating haze that kills sharpness. A microfiber cloth or clean t-shirt takes two seconds. This single habit prevents more ruined photos than any technical setting.
For portraits, use portrait mode. The simulated background blur separates your subject from a busy beach or jungle background. Position the person a few feet from the background, shoot in good light, and the blur effect looks natural.
One iPhone trick worth knowing: shoot a Live Photo of moving water (ocean, waterfall), then open it in Photos and swipe up to select the “Long Exposure” effect. It produces a silky-water look without a tripod — works surprisingly well for casual waterfall and wave shots.
Camera Settings for Hawaiʻi Conditions
Mirrorless and DSLR shooters need a few Hawaii-specific adjustments.
Your camera’s meter will lie to you at the beach. All that bright sand tricks it into underexposing, giving you gray sand and dark subjects. Dial in +0.7 to +1.0 exposure compensation for beach shots. Check the histogram — you want highlights pushed right without clipping.
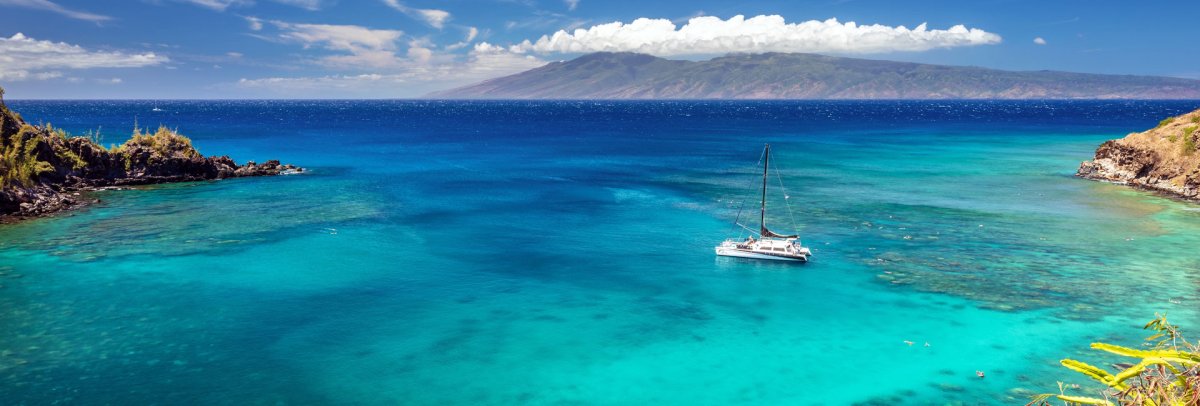
A circular polarizer is the single best piece of gear you can bring. It cuts glare off the ocean surface, reveals the reef below the water, deepens sky blue, and saturates rainforest green. None of this is replicable in post-processing. A quality polarizer runs $25-$80 depending on filter diameter. Rotate it while looking through the viewfinder until the water goes transparent and the sky pops.
Shoot RAW instead of JPEG. Hawaiʻi’s contrast range exceeds what a single JPEG exposure can capture, and RAW files retain the shadow and highlight detail you need to recover blown skies and dark foregrounds later. The files are larger — bring an extra SD card.
Near water, keep your shutter at 1/500s or faster to freeze waves and splashing. For silky waterfall shots, go the other direction: 1/4s to 2 seconds on a tripod or stable rock. A small travel tripod weighing under 2 pounds makes this easy without adding bulk to your bag.
Shooting Specific Hawaiian Subjects
Sunsets. Everyone photographs the sunset. Most of those photos are boring. The sky is doing interesting things, but a photo of just sky and horizon lacks scale and interest. Fix: include a foreground element. A silhouetted palm tree, a person walking at the water’s edge, a canoe on the sand, a rocky outcrop. Frame the sunset as the backdrop, not the entire subject. Expose for the sky (tap on the brightest cloud) and let the foreground go dark as a silhouette.
Waterfalls. Shoot waterfalls in shade or overcast conditions — direct sunlight creates harsh contrast between the white water and dark rock that no camera handles well. Morning at most valley waterfalls means shade. Use a slow shutter speed (1/4 second or longer) for the silky water effect, or a fast speed (1/500+) to freeze individual drops. Both look great — pick based on mood. A polarizer removes glare from wet rocks and spray.
Underwater and snorkeling. A waterproof phone case rated to at least 30 feet opens up a world of shots. Shoot in shallow, clear water with the sun behind you — light penetrating the surface illuminates fish and coral. Get close to your subject; water absorbs light and color, so distance kills both sharpness and saturation. The best underwater photos are taken within 3-4 feet of the subject.
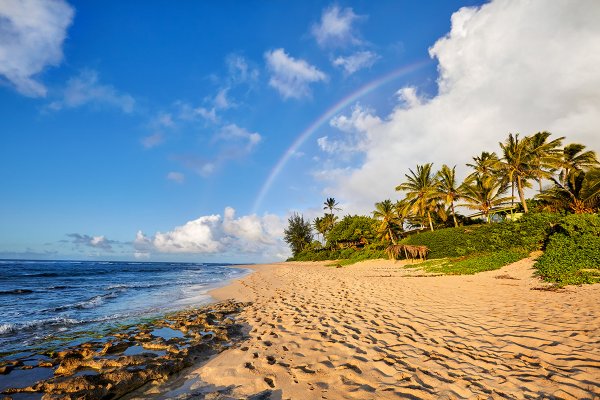
Rainbows. Hawaiʻi sees more rainbows than almost anywhere on Earth — a 2021 study by University of Hawaiʻi atmospheric scientists confirmed the islands have uniquely ideal conditions for rainbow formation, thanks to frequent passing showers and strong sunlight. Rainbow photography rule: the sun must be behind you. Face the rain with the sun at your back and look for the arc. Use a wide-angle lens or 0.5x phone lens to capture the full bow. Rainbows are brightest against dark clouds, so underexpose slightly to saturate the colors. One warning: if you’re using a polarizing filter, rotate it carefully. A CPL can enhance rainbow colors at one angle and erase the rainbow entirely at another.
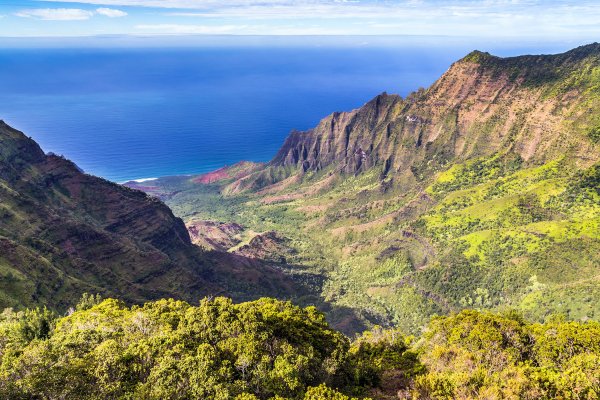
Volcanic landscapes. The Big Island’s lava fields at Hawaiʻi Volcanoes National Park are stark, textured surfaces that look best in low-angle light (early morning or late afternoon). The black rock absorbs light and goes featureless at midday. Dawn at the Kīlauea caldera produces mist, color, and shadow that midday visits completely miss. If the volcano is actively producing glow, twilight (30 minutes after sunset) is the time — the sky retains blue while the glow becomes visible.
Cultural Etiquette with a Camera
Hawaiʻi has cultural boundaries around photography that mainland visitors often miss.
Some hula is sacred. Photographers clicking away during a ceremony can be disruptive and disrespectful. At commercial lūʻau shows, photography is usually welcome — they’ll tell you. At cultural events, temples, and community performances, ask an organizer before pulling out a camera. The Merrie Monarch Festival in Hilo, Hawaiʻi’s most prestigious hula competition, has specific photography rules that vary by event.
Certain places in Hawaiʻi are kapu (sacred or restricted). Burial sites, heiau (Hawaiian temples), and specific natural features carry spiritual significance. If you see ahu (stone cairns) or lei offerings, you’re near a sacred space. Photograph the general scenery, but leave the offerings alone and don’t photograph them.
Local residents going about their day aren’t tourist attractions. Street photography is legal in public spaces, but pointing a camera at someone’s family or children without asking is rude in any culture.
If you brought a drone, check restrictions first. National parks, state parks, most beaches, and areas near airports (which covers much of urban Oʻahu) are FAA no-fly zones. Many county parks have their own bans. Use B4UFLY before launching. Federal fines are real.
Gear Worth Packing
Bulky gear stays in the hotel room. You’ll carry your phone everywhere regardless, so optimize for that first.
Essential: Waterproof phone case (for snorkeling and beach protection), microfiber lens cloth, portable charger (long days drain batteries fast).
Worth it: Circular polarizing filter (if you have a camera — the single biggest image quality improvement for tropical shooting), a clip-on phone polarizer (a $15-$25 upgrade that works surprisingly well), reef-safe sunscreen for your hands (greasy sunscreen fingers are the enemy of clean lenses).
Nice to have: Lightweight travel tripod (for waterfalls and night shots), a dry bag for kayaking and boat trips, a spare SD card.
Skip it: Heavy telephoto lenses (unless you’re serious about wildlife/whale photography), flash units (natural light is better for almost everything in Hawaiʻi), and camera rain covers (if it’s raining hard enough to need one, the photos won’t be worth taking — wait 15 minutes and the shower will pass).
Pick one morning to wake up for sunrise. Stay on the beach through one sunset. Clean your lens before every shot and tap to expose for your subject. Do just that and you’ll come home with photos that actually look like Hawaiʻi, not a washed-out postcard.
More Hawaii Inspiration
Plan your island photo ops.